Python Django
Django
| 개념 | 웹 개발의 종합선물세트 웹 개발 프레임 워크 파이썬으로 만든 웹 프레임워크 빠르고 효율적인 웹 개발, MVT 패턴 |
| 장점 | 웹 개발 속도 극대화 코드 재사용 및 모듈화 안전한 웹 애플리케이션 구축 |
| 단점 |
막강한기능을 잘 이용하려면 숙련 및 개념탑재가 필요하다
익혀야하는 개념들이 쪼끔 복잡하고 까다롭다. |
들어가기에 앞서 배경지식이 되는 가상 환경에 대해 알아보자
가상환경
가상환경 등장배경
프로젝트별로 정리된 환경을 보관
ex) A에는 tensorflow가 필요하고 B에는 django만 필요합니다.
심지어 A는 python 3.11 버전이 B는 python 3.10 버전을 사용해야 합니다.
각각의 프로젝트에 맞게 라이브러리 환경을 쉽게 조정하고 싶어요.
가상환경 활용
다른 사람이 만들어 놓은 유용한 기능들을 서로 공유하고, 재사용
유지보수 용이
코드 재사용 용이
디자인 패턴
객체지향 프로그래밍 OPP
함수형 프로그래밍 FP
Open Source: 개인 혹은 회사가 만든 코드를 외부에 공개
open source로 공개된 라이브러리를 쉽게 가져다 쓰는 방법들이 고안
| python | pip, conda |
| nodejs | npm |
| php | composer |
| ruby | gems |
패키지 매니저 - pip
파이썬 Package 고나리 시스템
Python Package Index(PyPI)에서 많은 파이썬 패키지를 볼 수 있다.
# pip 버전 확인
> pip --version

# pip 최신 버전으로 업데이트
> pip install --upgrade pip

# 설치된 pip 패키지
> pip list

# pip 패키지 설치
> pip install package_name
설치된 패키지의 사용 코드
- from + [패키지 or 파일]
- import + [코드 내에서 사용할 something]
- as + [코드 에서 사용할 이름]
| 1. Django 환경설정 2. Django 프로젝트 세팅과 배포 3. Django Routing 4. Django Function View |
1. Django 환경설정
환경설정은 어렵고 복잡하다
conda 재설치가 필요한지 확인
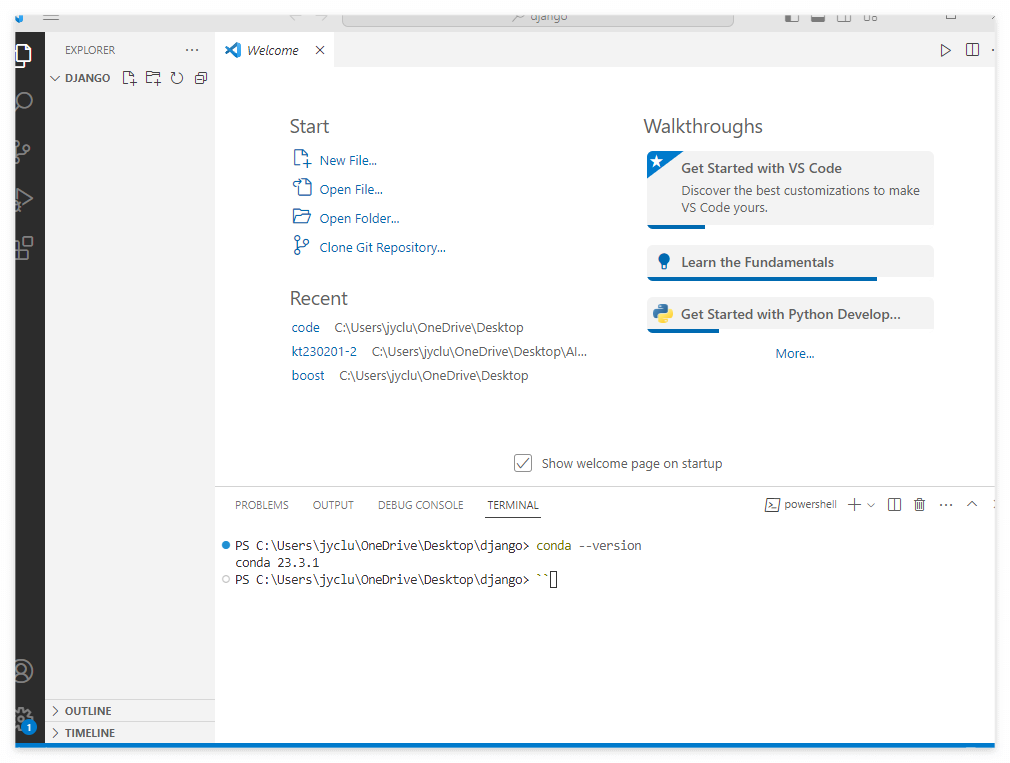
- vscode 실행
- 터미널 > 새 터미널 실행
- `conda --version` 명령 실행
-> command not found 가 나오면 아나콘다 재설치 필요
ANACONDA 재설치
- 프로그램 추가 삭제 에서 아나콘다 삭제
- 로컬에 설치된 모든 파이썬 삭제
- anaconda 설치 위치 가서 폴더 삭제
- anaconda archive 에서 2022.10 다운로드 - 이번기수 공식 anaconda
- anaconda 설치 (with path 잡기)
Python Django 설치
| Python | https://www.python.org/ |
| Django | https://www.djangoproject.com/ |
conda 가상 환경 세팅
# 설치 가능한 파이썬 버전 목록 확인
$ conda search python

# 새로운 파이썬 버전 설치
$ conda install python=3.10.11

# myenv 이름으로 새로운 파이썬 가상환경 생성
$ conda create -n myenv python=3.10.11

# myenv 파이썬 가상환경 사용
$ conda activate myenv

# 파이썬 가상환경 종료
$ conda deactivate

# 등록된 가상환경 목록 출력
$ conda env lis
# myenv 파이썬 가상환경 사용
$ conda activate myenv
# pip 최신 버전으로 업데이트
$ pip install —-upgrade pip
# django 설치
$ pip install django
Python & Django 설치 확인
$ python --version
Python 3.10.11
$ python
Python 3.10.11 (main, Apr 29 2023, 02:18:55) [Clang 14.0.3] on darwin
Type "help", "copyright", "credits" or "license" for more information.
>>> import django
>>> django.get_version()
'4.2'
>>>
2. Django 프로젝트 세팅과 배포
장고 프로젝트 만들기
 |
프로젝트는 여러개의 앱을 포함한다. |
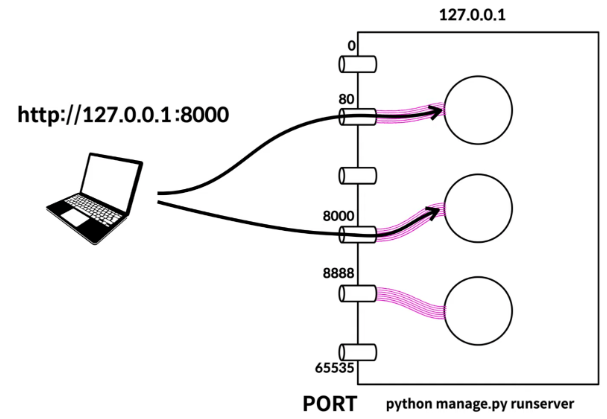
| 개발 서버 실행 - django default port: 8000 - runserver 9000으로 입력하면 9000 port 사용 |
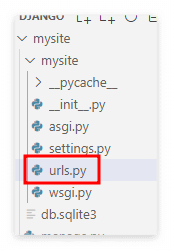
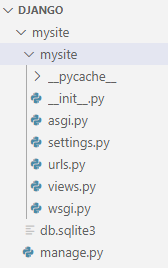
프로젝트 폴더 확인
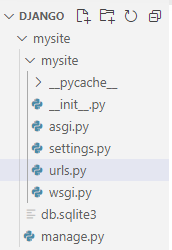 |
manage.py - django 프로젝트를 진행하고 관리하는 데에 필요한 유틸리티 프로그램 mysite (project name과 동일 폴더) - 프로젝트 전체를 관리하는 폴더 mysite/settings.py: 프로젝트의 환경 설정 mysite/urls.py: 사이트의 main URL 관리 |
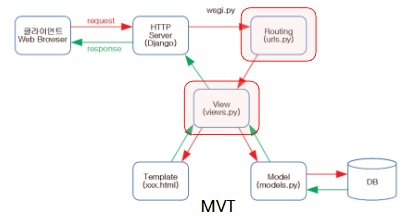
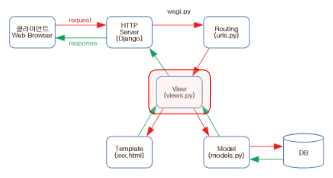
MVT 구조
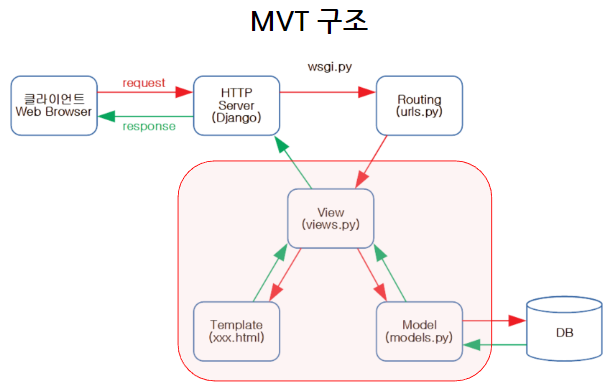 |
Model: 데이터 베이스와 소통하는 역할 |
| View: 사용자의 요청을 처리하고 응답을 준비하는 과정 | |
| Template: 사용자에게 보여지는 멋진 화면을 생성 |
Anaconda Powersheel Prompt 실행
| cd "파일경로" code . |

code . 코드를 통해 가상환경 VSCODE 실행된다.
TERMINAL
# 1. 프로젝트 만들기 & 이동
$ django-admin startproject mysite
$ cd mysite

# 2. 앱 생성
$ python manage.py startapp myapp
# 프로젝트 만들기 & 실행
$ django-admin startproject mysite
$ cd mysite
$ python manage.py runserver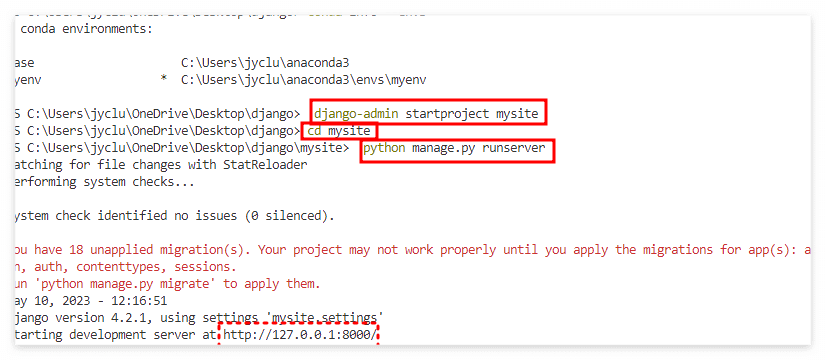
http://127.0.0.1:8000/ 접속

요렇게 로컬 주소로 홈페이지 접속이 가능하다.
아무것도 만들지 않았기 때문에 장고 기본화면이 나온다.
로컬페이지에 hello 출력하기
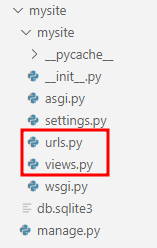
urls.py 생성
from django.contrib import admin
from django.urls import path
from django.http import HttpResponse
def hello(request):
 return HttpResponse("hello")

urlpatterns = [
 path('admin/', admin.site.urls),
 path('hello/', hello),
]| HttpRequest | client로부터 전달되는 값이 들어있다. |
| HttpResponse | response에 필요한 자질 구레한 내용을 알아서 만들어 준다. |
| Path | url과 함수 연결 |
http://127.0.0.1:8000/hello/ 접속

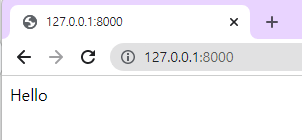
http://127.0.0.1:8000/ 접속
from django.contrib import admin
from django.urls import path
from django.http import HttpResponse
def index(req):
 html = "<h1>hello</hello>"
 return HttpResponse(html)

urlpatterns = [
 path('admin/', admin.site.urls),
 path('', index),
]
서비스 배포
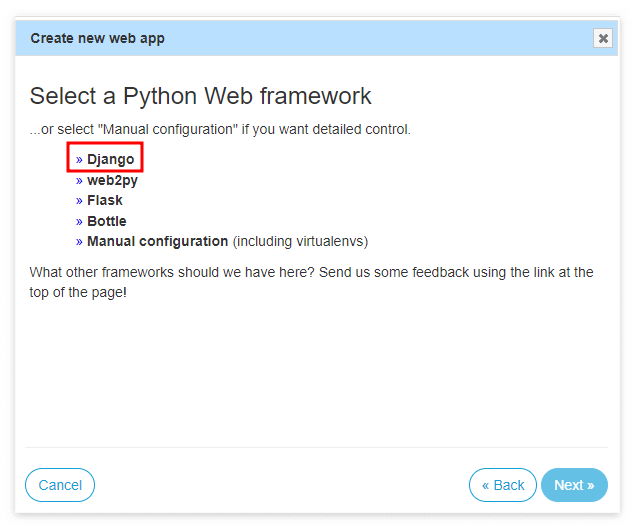
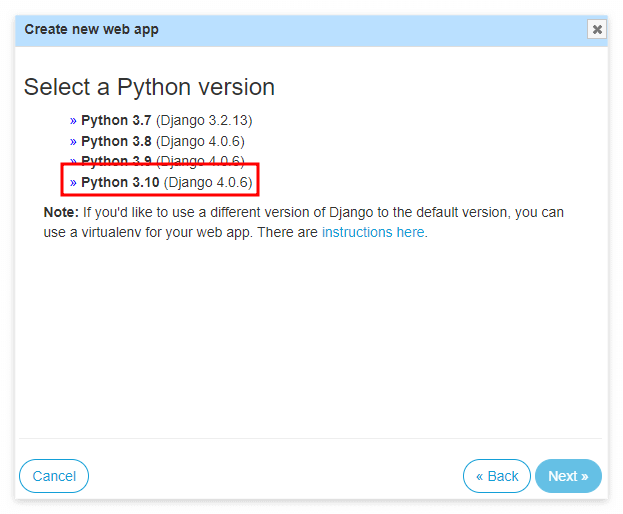
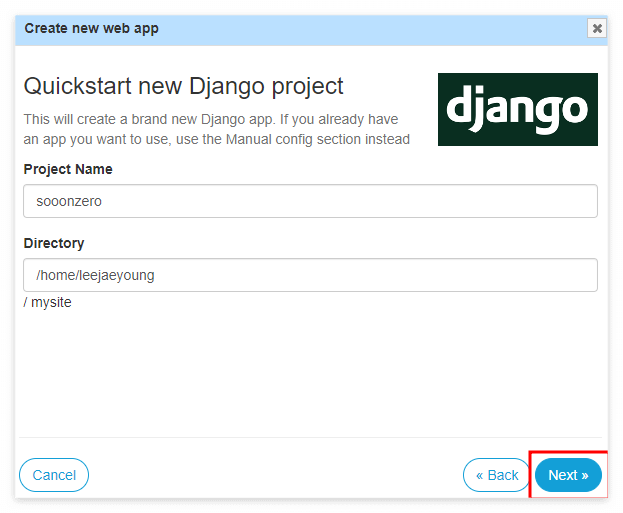
PythonAnyWhere 활용하기
Host, run, and code Python in the cloud: PythonAnywhere (www.pythonanywhere.com)
Host, run, and code Python in the cloud: PythonAnywhere
Batteries included With Python versions 2.7, 3.6, 3.7, 3.8, 3.9 and 3.10, and all the goodies you normally find in a Python installation, PythonAnywhere is also preconfigured with loads of useful libraries, like NumPy, SciPy, Mechanize, BeautifulSoup, pycr
www.pythonanywhere.com
회원가입 후 설정 방법
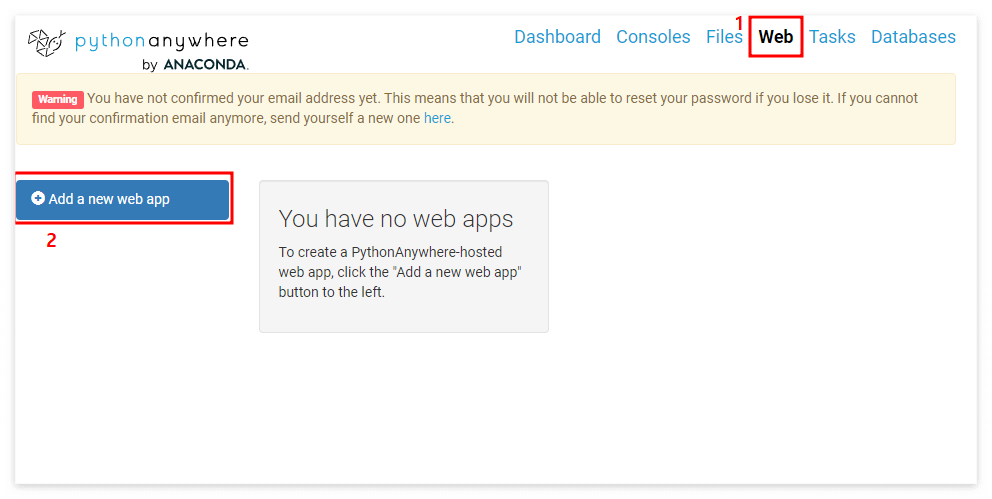
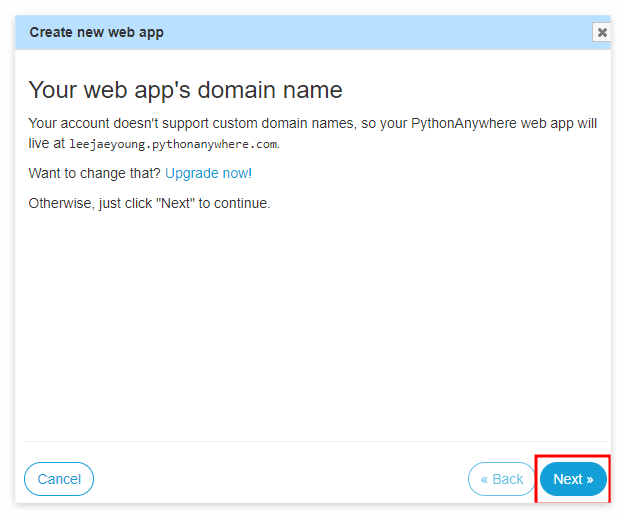

강의 중 한번에 사람들이 몰려서 그런지 오류가 뜬다ㅎㅋㅋㅋ
Django Routing
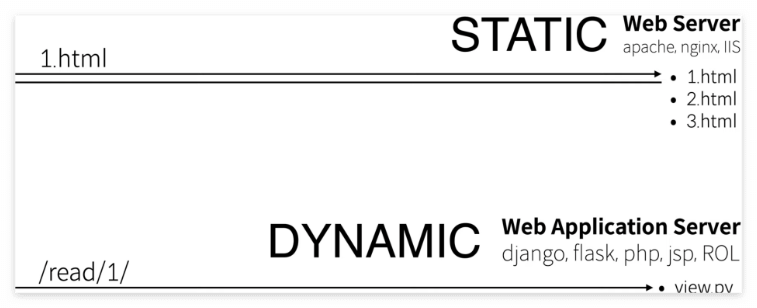
Routing 개념
경로와 함수를 연결한다.
경로를 확인하고, 어떤 함수를 실행할지 결정한다.
경로의 일부를 함수의 파라미터로 전달하는 방법이 있다.
함수는 HTML 코드를 완성해서 응답한다.
Django Routing 4가지 방식
# urls.py
from django.urls import include
from django.urls import path, re_path

urlpatterns = [
    # 기본형태
    path('', index),

    # 경로에서 parameter 전달
    path('gugu/<num>/', gugu),

    # 앱의 url.py로 하위 url routing
    path('account/', include('account.urls')),

    # regular expression을 이용한 routing
    re_path(r'^search/(?P<year>[0-9]{4})/$', search_by_year),
re_path(r'^search/(?P<keyword>\w+)/$', search_by_keyword),| urlpatterns | 주소록. 이 곳에 url과 view의 연결 목록을 작성한다. |
| path | url 문자열과 view를 연결해주는 함수 |
| re_path | regex를 이용하여 url 문자열과 view를 연결해주는 함수 |
MVT
함수들은 views.py 파일로 분리
# urls.py
from django.urls import path
from . import views

urlpatterns = [
    path('', views.index),
    path('blog/', views.list),
    path('blog/post/<id>/', views.post),
]
# views.py
from django.http import HttpResponse
def index(request):
return HttpResponse("Hello")
def list(request):
return HttpResponse("List")
def post(request, id):
return HttpResponse(f"Post {id}")Django Routing 활용1 : 구구단 페이지 만들어보기
각 페이지 URL에 맞춰 구구단을 출력하는 페이지 만들기
views.py, urls.py 생성
# views.py
from django.http import HttpResponse

def index(request):
 return HttpResponse( "Hello")

def list(request):
 return HttpResponse( "List")

def post(request, id):
 return HttpResponse( f"Post {id}")

def gugu(req, num):
 num = int(num)
 gugudan = [f'{num} * {i} = {num*i}' for i in range(1, 10)]
 print(gugudan)
 print("\n".join(gugudan))
 return HttpResponse("<br>".join(gugudan))


def naver(req):
 import requests
 res = requests.get('https://www.naver.com')
 return HttpResponse(res.content)
from django.contrib import admin
from django.urls import path
from django.http import HttpResponse
from . import views
urlpatterns = [
path('', views.index),
path('blog/', views.list),
path('blog/post/ <id>/', views.post),
path('gugu/<num>/', views.gugu),
path('naver/',views.naver)
]
결과
http://127.0.0.1:8000/gugu/숫자/ 접속
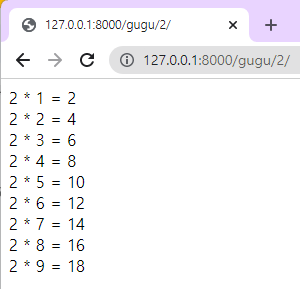
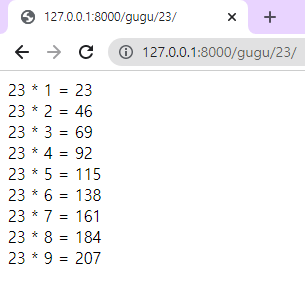

숫자 에 따른 구구단 출력 결과를 확인할 수 있다.
Django Routing 활용2 : 원하는 사이트를 보여주는 페이지를 만들어보자.
이 코드를 활용하면 된다.
import requests

# 웹에서 html을 가져와서 출력하는 코드.
res = requests.get("https://www.kt.com/")
print(res.content)
rom django.http import HttpResponse

html = """(생략…)
    <h1><a href="/">Django</a></h1>
    <ol>
        <li><a href="/chapter/01/">Setting & Deploy</a></li>
        <li><a href="/chapter/02/">Routing & View</a></li>
    </ol>
    <h2>{title}</h2>
    <p>{content}</p>
(생략…)"""

chapters = {
   "01": {"title": "Setting & Deploy", "content": "Setting & Deploy is ..."},
   "02": {"title": "Routing & View", "content": "Routing & View is ..."},
}

def index(req):
      return HttpResponse(html.format(
         title='Django',
         content='<a href="https://www.djangoproject.com/" target="_blank">Django</a>는 Python으로 작성된 오픈 소스 웹 프레임워크로, 빠르고 쉬운 웹 개발을 가능하게 합니다.'
      ))

def chapter(req, id):
      return HttpResponse(html.format(**chapters.get(id)))
# views.py를 import 해서 사용
from django.urls import path
from . import views
urlpatterns = [
path('', views.index),
path('chapter/<id>/', views.chapter),
]+) import의 형태를 다르게 하는 방법도 알아두자
# views.py 내의 함수를 직접 import 해서 사용
from django.urls import path
from .views import *

urlpatterns = [
   path('', index),
   path('chapter/<id>/', chapter),
]
Django Function View
View 개념
사용자의 요청을 처리하고 응답을 준비하는 과정
View 동작
Django에서는 뷰(View)를 사용하여 클라이언트의 요청을 처리하고, 응답을 반환합니다.
# views.py
from django.http import HttpResponse
def index(request):
   return HttpResponse("hello")
request: client로부터 전달되는 값이 들어있다.
response: 응답에 필요한 자질 구레한 내용을 알아서 만들어 줌.
View의 두 가지 형태 ( 함수로 구현한 뷰, 클래스로 구현한 뷰 )
함수로 구현한 뷰 - Function-Based View
간단하고 직관적
디테일한 구현을 직접해야 함
from django.http import HttpResponse

def hello(request):
    return HttpResponse('Hello, world!')
클래스로로 구현한 뷰 - Class-Based View
패턴화된 뷰 구조를 쉽게 구현
높은 추상화로 구조나 코드 이해가 어려움
from django.views import View
from django.http import HttpResponse

class HelloView(View):
    def get(self, request):
        return HttpResponse('Hello, world!')
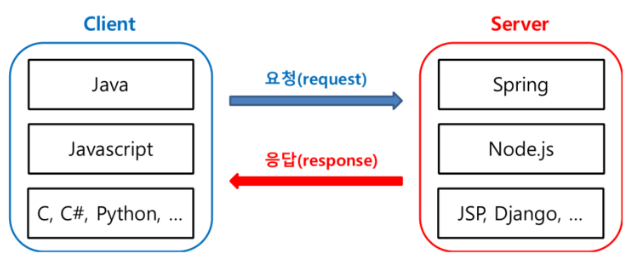
HTTP 요청의 종류(Request), 응답의 종류(Response)
View의 Response 종류
| HttpResponse | 문자열 형식의 응답을 반환합니다. |
| JsonResponse | JSON 형식의 응답을 반환합니다 |
| HttpResponseRedirect | 다른 URL로 Redirect 합니다. |
| HttpResponseNotFound | 404 Not Found 에러를 응답합니다. |
from django.http import HttpResponse, JsonResponse
from django.http import HttpResponseRedirect, HttpResponseNotFound
import json

def hello(request):
    return HttpResponse("Hello, world!")

def hello_json(request):
    data = {'message': 'Hello, world!'}
    return JsonResponse(data)

def redirect_to_hello(request):
    return HttpResponseRedirect('/hello/')

def page_not_found(request):
    return HttpResponseNotFound('<h1>Page not found</h1>')
View의 Request 구분
GET Method와 Query String
POST Method와 Body
Method 종류는 GET/POST 이외에 PUT/PATCH/DELETE 등 다른 방식도 있다.
csrf_exempt와 다른 Method는 뒤에서 설명
from django.http import HttpResponse
from django.views.decorators.csrf import csrf_exempt

@csrf_exempt
def search(request):
    print(request.method)
    print(f"Query String: {request.GET.get('q')}")
    print(f"BODY: {request.POST.get('key', '')}")
    return HttpResponse(f'search')
View 연습하기: 직접 요청을 보내서 결과 확인해보기
import requests

requests.get("http://localhost:8000/search/")
requests.get("http://localhost:8000/search/?q=name")
requests.post("http://localhost:8000/search/", data={'key': 'value'})
requests.post("http://localhost:8000/search/?q=name", data={'key': 'value'})
JSON 개념
JSON(JavaScript Object Notation)의 약자로 JavaScript에서 객체를 만들 때 사용하는 표현식을 의미.
사람도 이해하기 쉽고 기계도 이해하기 쉽다.
데이터의 용량이 작다.
library json 개념
자바스크립트에서 사용하는 객체 표현식.
웹에서 주고받는 데이터의 표준이 되었다.
library json 주요 속성
| dumps | 객체를 json string으로 변환 |
| loads | json string을 객체로 변환 |
import json

words = [
    {'word': 'hello', 'count': 10},
    {'word': 'hello', 'count': 10},
    {'word': 'hello', 'count': 10},
    {'word': 'hello', 'count': 10},
]
str_json = json.dumps(words)
str_json
# '[{"word": "hello", "count": 10}, {"word": "python", "count": 5}, {"word": "django", "count": 8}]'

words_from_json = json.loads(str_json)
words_from_json[0]
# {'word': 'hello', 'count': 10}
웹에는 HTML이 아닌 JSON을 반환하는 페이지가 있다.
ex) git hub
JSON 연습하기: JSON 문자열 처리
python 언어로 된 git repo 정보를 추출한다.
import json
import requests

url = "https://api.github.com/search/repositories"
params = {'q': 'requests+language:python'}
res = requests.get(url, params)

repos = json.loads(res.text)
print(repos['total_count'])
print(repos['items'][0])
이거 어디다 넣어야하지,, 나중에 강의 다시보고 수정해야겠다.
웹에서 html을 가져와서 출력하는 코드
import requests

res = requests
'KT AIVLE School 3기 > AIVLER 활동' 카테고리의 다른 글
| [AIVLE_AI]Django활용 Web App 개발 3일차 (0) | 2023.05.12 |
|---|---|
| [AIVLE_AI]Django활용 Web App 개발 2일차 (0) | 2023.05.11 |
| [AIVLE_AI] 가상화 클라우드 실습 (1) | 2023.05.08 |
| [AIVLE_AI] SQL 2일차 (0) | 2023.05.08 |
| [AIVLE_AI] SQL 1일차 (0) | 2023.05.08 |